
I am not blessed with square footage or south-facing windows in my home office—it's a cave. What's more, is that I share my home office with The Boyfriend. Keeping these factors in mind, I knew I needed a low profile desk with clean lines that wouldn't feel too bulky in the space. When you're refurnishing your apartment on a budget like me, you can't just walk into Restoration Hardware and charge a $3,000 desk on your credit card. After fruitless Craigslist searches, I turned to Ikea. Ikea has a table top/leg system that's been around for years. Until recently, I always found that the leg options were too bulky or plain for my taste. Lerberg Trestle Legs were exactly what I was looking for. So I combined one long Linnmon table top, two Lerberg trestle legs, and one Alex drawer unit.
Like many bloggers and DIY-ers, Pinterest plays a big role in the inspiration department. I noticed that most DIY tutorials involving the Linnmon Desk were variations on painting the table legs gold. The pictures are beautifully edited and the room in which the table is placed has natural light for days. However, I found that none of the tutorials I found online talked about lighting or measurement. So here are some key points you should keep in mind before you start a DIY furniture project:
4 Things to Remember When Updating Furniture
- Lighting is key. Natural light lets you choose basically any color you want, while fluorescent or LED lighting can cast yellow or bluish lighting in a room. Just because something looks good in a Pinterest picture, doesn't mean it will look like that in your own home.
- Measure everything. Know how much space you're working with and how much space your furniture will take up. Either jot down measurements taken with a tape measurer, or use one of the many floorplan apps that exist for tablets and phones. My favorite is the iOS MagicPlan App.
- Test drive your furniture. Bring your furniture into its designated room before you make any changes to see how it looks in existing lighting conditions. You may find that you only want to alter parts of your furniture, rather than the entire piece.
- Keep everyone's preferences in mind. If your piece of furniture is going to be shared, remember to consult the people who will use it most. What's the point if nobody else in your home can enjoy the newly updated furniture?
Keeping these rules in mind, I knew gold wouldn't pop with my yellow-ish lighting and oak floors, so I opted for bright, Red-Orange legs with a chevron table top edge. I love that the pop of color and pattern aren't overpowering or too feminine for The Boyfriend. What do you think?
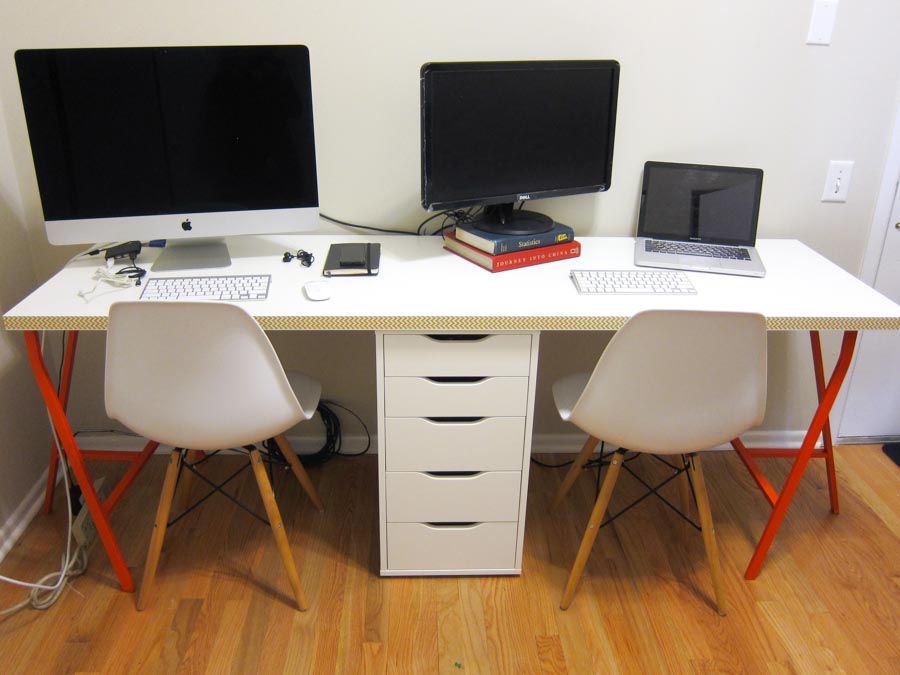
Final product!
DIY LINNMON/ALEX/LERBERG TWO-PERSON DESK
TOTAL COST: Approximately $160
MATERIALS:
- 1 Long Linnmon table top (78 3/4" long), $45.00
- 1 Alex drawer unit, $79.99
- 2 Lerberg trestle legs, $10.00
- 1 Spray Paint Primer (I used Rustoleum American Accent Primer; $8.96)
- 1 Spray Paint Color ( I used Red-Orange Montana Gold, $13.70)
- Drop cloth or several trash bags (I used trash bags and leftover Ikea boxes, Free)
- 1 Mask or bandana to cover your nose & mouth (I own my own bandana, Free)
- 1 roll of 1 1/8" washi tape (I bought mine on clearance for $2.00)
DIRECTIONS:
- Assemble all of the furniture pieces and set aside.
- Set up a covered painting area with your drop cloth in a cool, ventilated space. (I used trash bags and the leftover Ikea furniture boxes.)
- Spray the Lerberg trestle legs with an even coat of primer. Do not skip this step. Primer lets the true color of your spray paint to show and allows for even coloring. Let dry for at least 1 hour.
- Spray the Lerberg trestle legs with the color of your choice. Spray from a distance so you can coat the legs evenly. Let dry for at least 1 hour.
- Spray one more color coat to hit any uneven patches. Let dry for at least 1 hour.
- Assemble the Linnmon table top, Alex drawer unit, and Lerberg trestle legs. You will not have to screw anything in. The weight of your computer and other office items will keep the table top from moving.
- Clean the desk so there is no dust on your table edges.
- Unroll 2" of the washi tape, but do not cut. Align the edge of the washi tape to the top of the table edge.
- Smooth out the washi tape as you simultaneously unroll more washi tape. Make sure you're smoothing out any air bubbles as you go along. You do not want to rush this step.
- When you reach the starting point again, carefully trim the washi tape. You should have one seamless piece around the entire edge of your table top.


